 Tiny Print App Docs
MINIPRINT
User manual for the MINIPRINT pocket printer and the Tiny Print app.
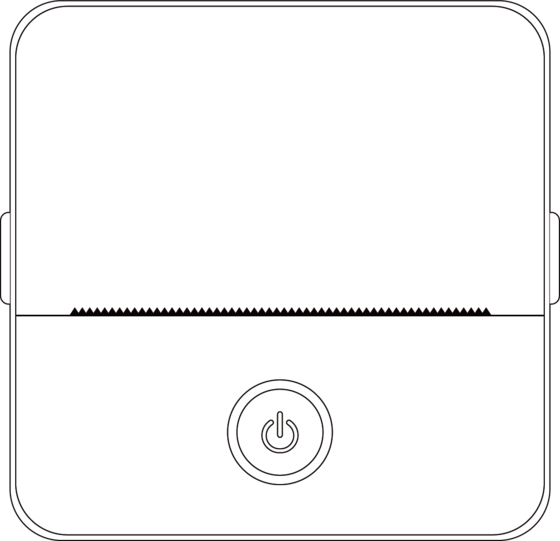
Thank you for choosing our company's intelligent digital products. We have included detailed instructions to assist you in using these products effectively. Before using this machine, please carefully read the instructions provided. This will ensure that you can use the product accurately. Please note that we do not provide advance notice for changes in the product's content. This product is a unique, sleekly designed, easy-to-operate portable mini printer designed for children's digital products. It encourages children to explore their imagination, engage in creative play, and experience the joy of nature.
Product Specifications
| Specification | Detail |
|---|---|
| Product size | 85 × 85 × 45 mm |
| Product weight | 160 g |
| Product material | ABS plastic |
| Printing method | Thermal printing |
| Printing sharpness | 200 dpi |
| Printing speed | 70 mm/sec |
| Battery type | Lithium Ion |
| Battery capacity | 3.7V, 800mAh, 2.96Wh |
| Input power | DC5V / 2A |
| Frequency band | 2.4 GHz |
| Max. radio-frequency power | -6 – 4 dBm |
| Charging interface | Type-C |
| iOS and Android app | Tiny Print |
| Connection method | Bluetooth |
Warnings & Safety Instructions
Maintenance & Care
- Avoid placing this product in a damp environment for an extended period. If the surface gets dirty, please clean it with a dry cloth.
- Regularly inspect wires, plug shells, and other components for damage. If you notice any damage, stop using the product immediately and have it repaired. Regular maintenance helps reduce battery aging and swelling.
- If you do not use the product for an extended period, charge it approximately every three months.
Battery Warning
- Use a 5V charger as specified to avoid damaging the device.
- Avoid disassembly, impact, extrusion, or exposure to fire.
- If the battery becomes severely swollen, discontinue use.
- Keep the product away from high-temperature environments and never use it after immersion.
- Using the wrong type of battery can be explosive. Always follow the instructions for disposing of used batteries.
Important Guidelines
- When charging, gently insert or remove the charging cable to prevent damage to the port.
- Unplug the charging cable promptly after charging.
- Do not use or charge the product in high-temperature, high-humidity, excessively smoky, or dusty environments, such as bathrooms, steam rooms, or near open flames.
- Improper charging can damage the print head.
- Avoid touching the print head to prevent overheating and burns.
- Be cautious around the sharp paper blade.
- This product contains small parts and is not suitable for children under three years of age. An adult should supervise children while they use it.
Device Set-up
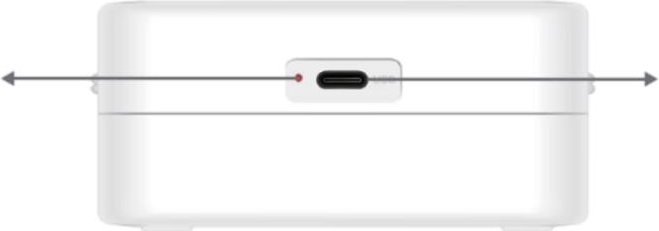
Charge the device fully before first use. During the charging process, the indicator light next to the charging port will illuminate in green. Once the device is fully charged, the indicator light will automatically turn off.
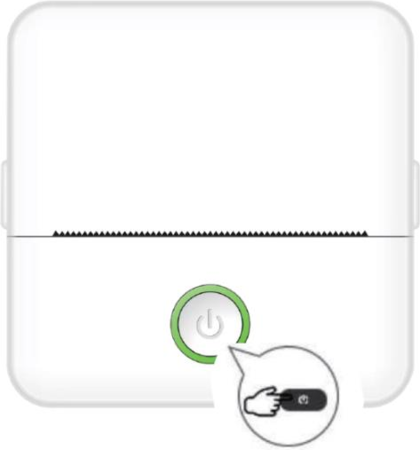
Turn the device on by pressing and holding the power button for three seconds. The device is turned on when the circular LED light around the power button starts pulsing green.
Install the Tiny Print app from your preferred app store to your smartphone (the app is iOS and Android compatible).

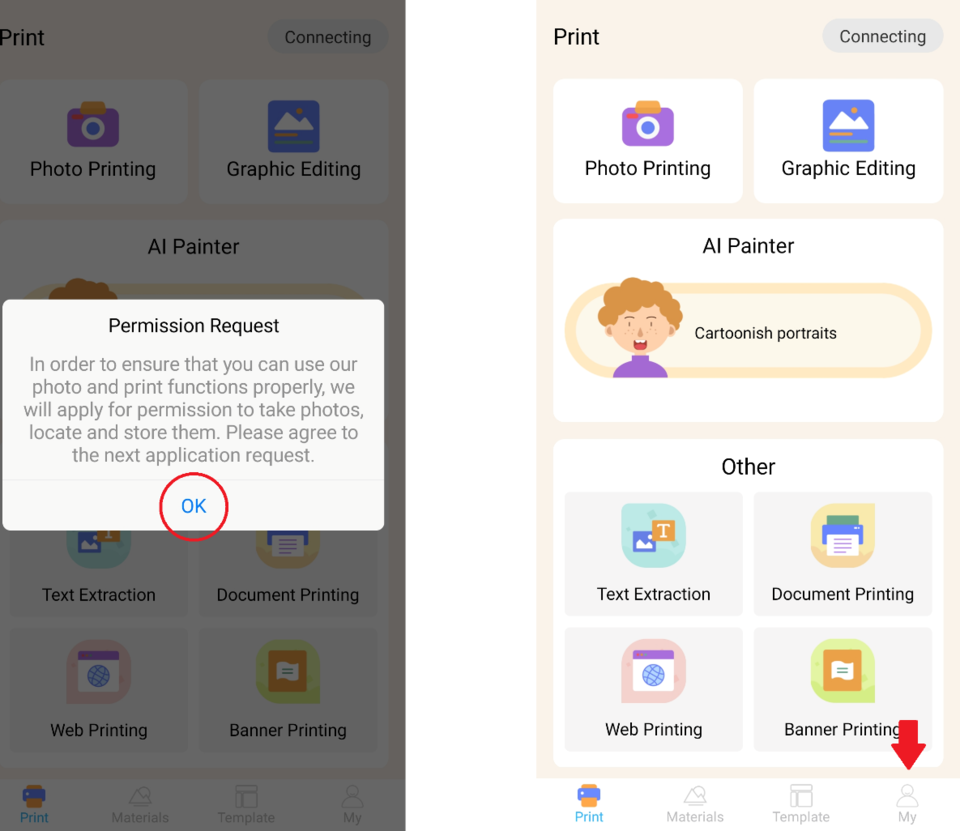
Connect the device. After installing the app, enable Bluetooth on your smartphone, then connect the device by following these steps:
- Open the Tiny Print app. When opened, a prompt will appear, asking for your permission to access files on your phone. Please grant this permission, otherwise you will not be able to use the MINIPRINT device.
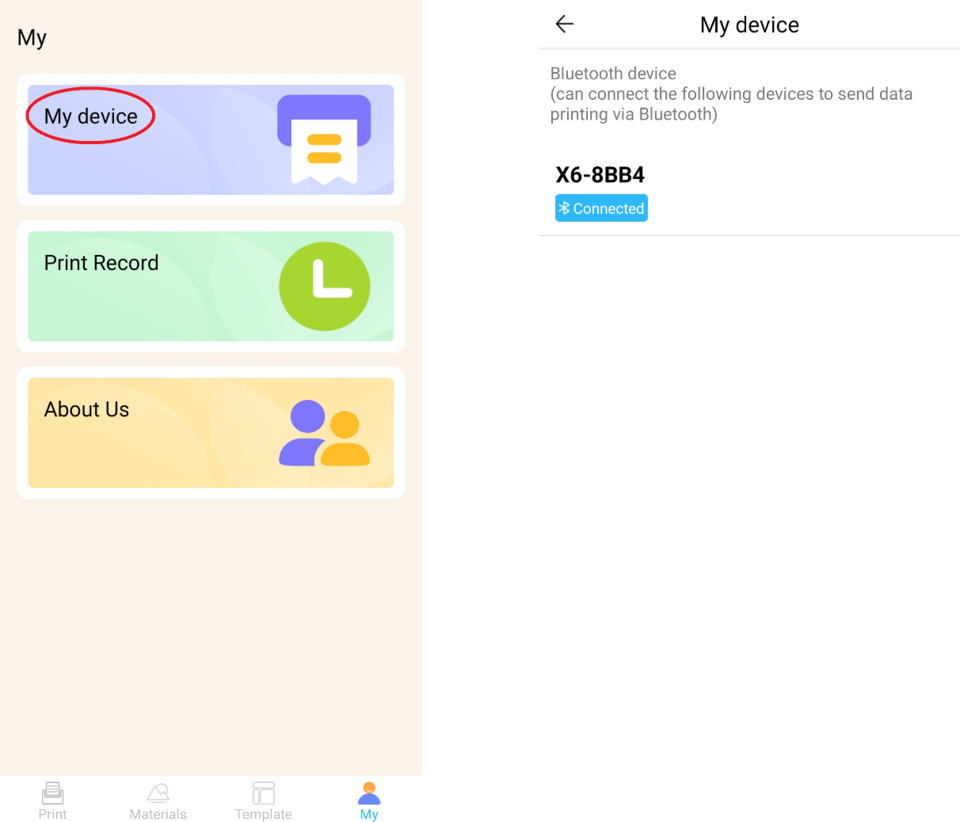
- Click on the My menu from the menu bar at the bottom and then click on the My device option on the menu screen.
- Your smartphone will search for active MINIPRINT devices in your vicinity. Ensure that your MINIPRINT device is turned on and that Bluetooth is enabled. Click on the detected device to establish a connection with your smartphone. Your device is connected and ready to use when you see the Connected sign appear below the device name.
Paper Insertion
Before you can utilize the various printing options that MINIPRINT offers, you need to insert one of the paper rolls included in the packaging into the device.
A paper roll may already be installed by the manufacturer.
To install a paper roll, open the storage compartment located at the top of the printer. Grasp the handles on either side of the compartment with your fingers and gently pull upwards while holding the rest of the device firmly with your other hand. Avoid using excessive force.
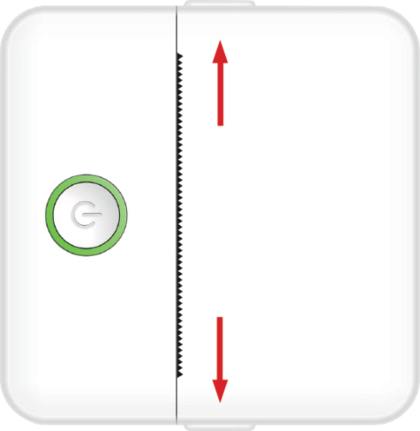
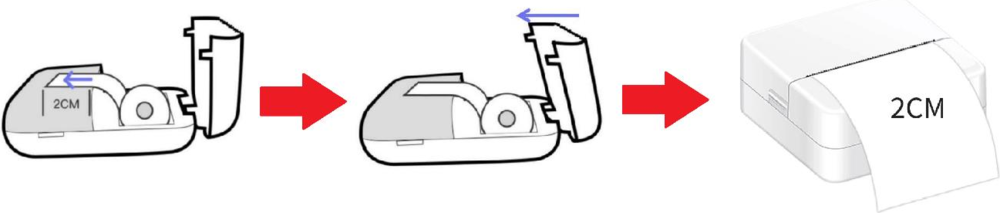
The paper roll is secured with a gentle adhesive. Before inserting the paper roll into the compartment, peel off the paper that is adhered to the rest of the roll. Unroll a few centimeters of paper and position the roll inside the compartment with the unrolled paper facing upwards (refer to the figure below). Ensure that at least 2 cm of paper is protruding from the compartment. Hold the extended paper in place and gently close the paper compartment. As the compartment is closed, the extended paper will be manually fed through the printer opening.
Repeat this process whenever the printer runs out of paper.
Printing Options
After connecting the MINIPRINT device to your smartphone, your device's name will appear on the main printing menu (located at the top right of the screen). MINIPRINT offers a wide range of printing options for you to choose from. The figure below provides a brief overview of each option. Detailed explanations for each option are provided in the following sections.
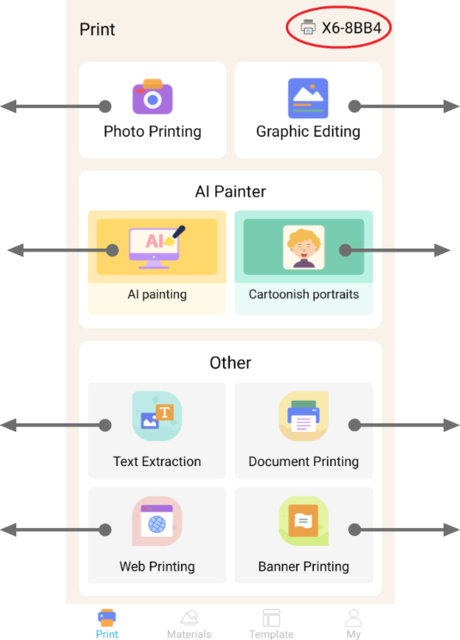
| Option | What it does |
|---|---|
| Photo Printing | Take a picture or choose existing photos from your gallery to print out. |
| Graphic Editing | Edit photos by adding text, doodles or inserting other images. |
| AI Painting | This AI feature creates images based on your text prompts. |
| Cartoonish Portraits | This AI feature transforms selfies and portraits into illustrations. |
| Text Extraction | This feature extracts words from images and creates a text file. |
| Document Printing | Print PDF, Word or other documents stored on your phone. |
| Web Printing | This feature extracts sections of web pages and prints them. |
| Banner Printing | Write text and create banners with a wide variety of fonts. |
Features
1. Photo Printing
Capture a new photo or select an existing one from your smartphone's gallery. Once selected, you can edit the photo by rotating it, using an eraser, or applying creative transformations with AI (specifically, the Cartoonish Portraits feature).
2. Graphic Editing
With this feature you can create a variety of image graphics. You can create text, import images, use a library of preset icons and frames, add doodles, and even create QR codes or barcodes. You can mix and match all these elements into a cohesive composition and print out your creation.
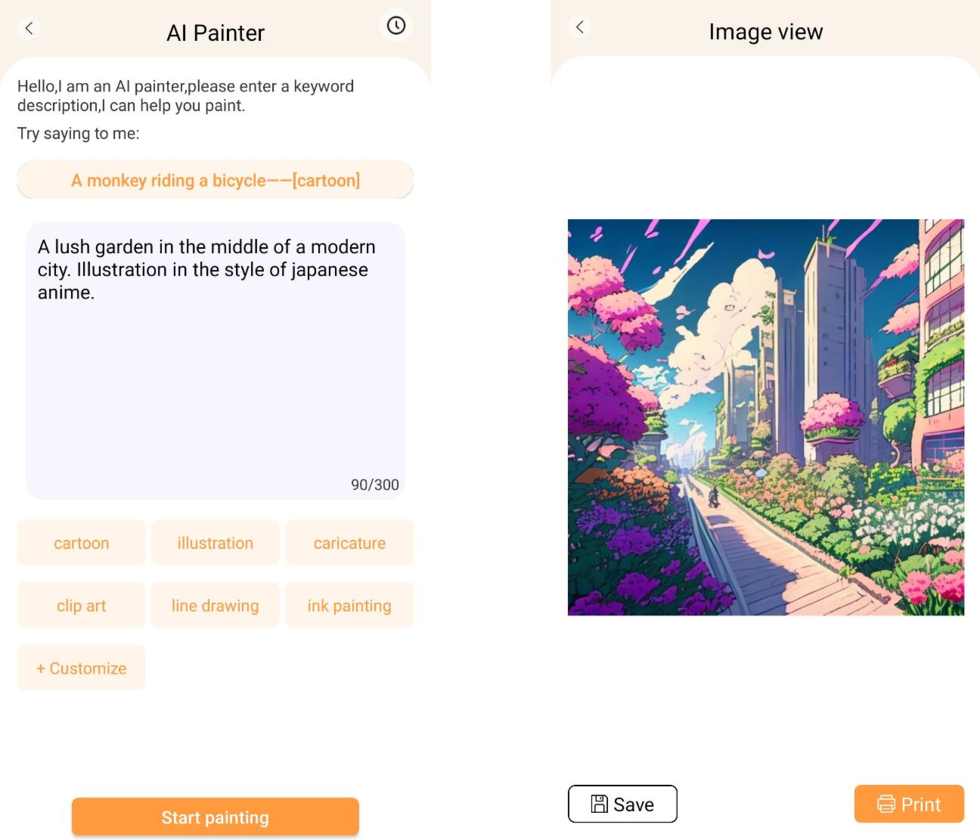
3. AI Painting
This feature utilizes AI to create images based on the text prompts you provide. An example of a text prompt is provided above the text box. Use descriptive language to write anything that will generate the desired image. Below the text box, you'll discover categories of art styles that can inspire the intended effect on the generated image. You can even create your own custom category. Enter your text in the text box (up to 300 characters) and press the Start Painting button at the bottom of the screen when you're ready. Please wait while the AI generates the image. If you're not satisfied with the results, click the Redraw button. If you're pleased with the generated image, click on it and choose to save or print.
4. Cartoonish Portraits
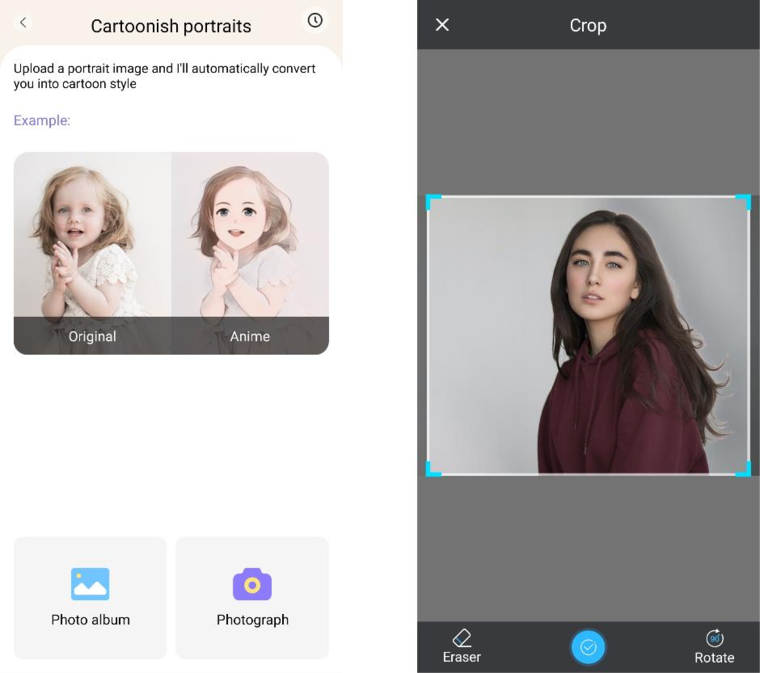
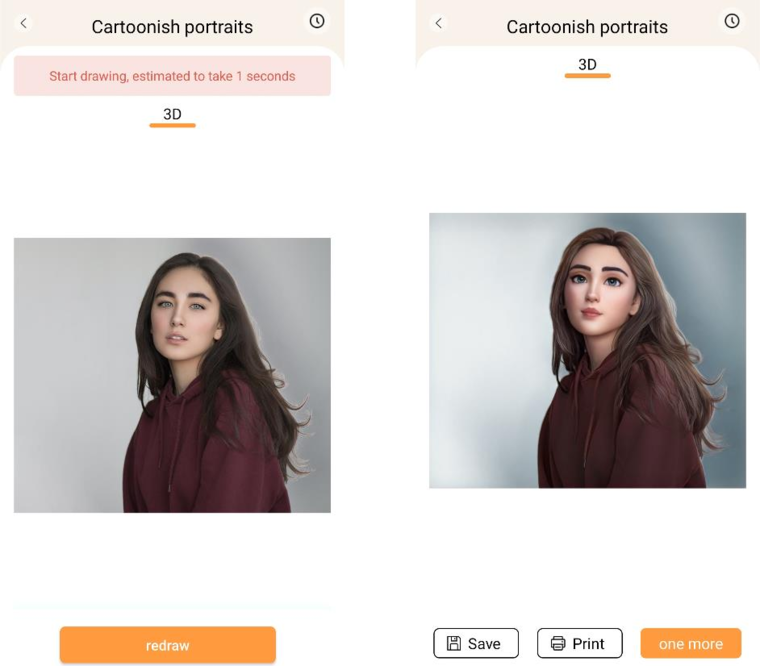
With this feature you can utilize AI technology to trace a new or existing portrait and transform it into an anime cartoon version, illustration, 3D painting, hand drawn image or a pencil sketch. Once you've selected a photo you want to transform, simply choose one of those options in the bottom sliding menu and wait for the AI to render the image. The rendering process takes a few seconds, so please be patient. You may then discard the created rendering, save or print it.
5. Text Extraction
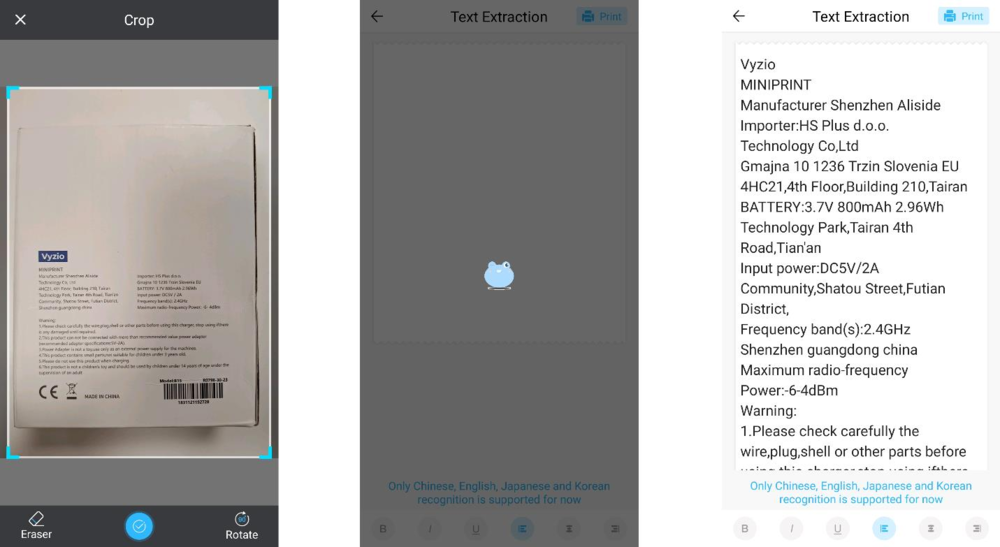
Take a photo of text on a page or screen. This feature will trace the chosen photo and extract text from the image, converting it into a text file you can edit and print. The bottom menu allows you to edit the extracted text by changing text style and print alignment.
6. Document Printing
This feature enables you to print PDF and Microsoft Word documents. Before the app can import these types of documents on your phone, you may need to grant the Tiny Print app read access.
You can grant read access by adjusting the app permissions in your phone settings (Settings → Apps → Tiny Print → Permissions → check under Allowed and Not allowed). If this doesn't work, you can simply access the files you want to print in your phone's Documents folder and choose to open the file with the Tiny Print app when the prompt appears.
7. Web Printing
This feature allows you to print web pages. When you select this feature, the Tiny Print app will open a web browser. Search for the web page you wish to print and choose from the options in the bottom menu (either to print the section currently displayed on your screen or to print the entire web page).
8. Banner Printing
With this feature, you can create text banners and print them out. Enter the desired text into the text box, and then adjust the text size and alignment.
9. The Materials Tab
This tab includes a variety of pre-made illustrations available for printing. Select a category at the top of the screen to find the desired image for printing.
10. The Template Tab
This tab offers three helpful categories of presets: Post-it notes, To-do lists, and Labels. Each category provides a selection of pre-designed templates for you to choose from and print.
Printing
After selecting your desired printing option, press the Print button to proceed to the final editing stage. A preview of the image will appear with the determined paper alignment. An estimate of paper usage will also be displayed beneath the preview image. Click on the arrow at the bottom, next to the Print button, to access additional printing options (see the figure below).
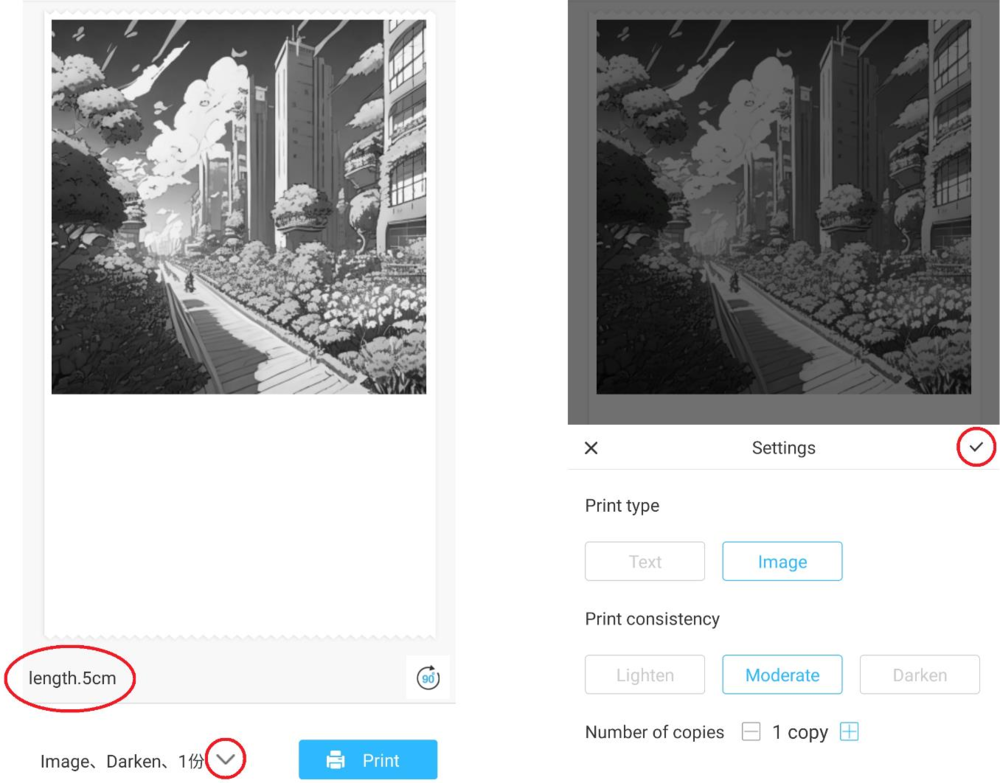
These settings determine the print type, consistency, and the number of copies to be made in the final print. In the Print type section, a suitable option is typically pre-selected. If you only wish to print text, click on the Text option; otherwise, leave the selection on Image. In the Print consistency section, you must choose the desired intensity of the print. If you select Lighten, the printed image will appear softer. This option is recommended when printing images with very few or no whites. Choose the Darken option if the image contains many whites and light colours. The Moderate option balances the darkness of the print output. Finally, at the very bottom, select the number of copies you want to print. Click on the + button to add copies.
Multiple copies will be printed with a 1.2 cm gap between each image. Printing multiple copies at once will also impact paper usage.
After you are satisfied with your selections, close the settings bar by clicking on the checkmark, as shown in the figure above. After that, click the Print button. The app will establish a connection with the device and begin the printing process. Once printed, remove the paper by tearing it along the plastic tear bar located at the edge of the printer opening.
Recycling & Disposal
 This label means that the product cannot be disposed of as other household waste throughout the EU. To prevent potential damage to the environment or human health from uncontrolled waste disposal, recycle responsibly to promote the sustainable use of material resources. If you want to return a used device, use the drop-off and collection system, or contact the retailer from whom you bought the product. The retailer can accept the product for environmentally safe recycling.
 A declaration by the manufacturer that the product complies with the requirements of the applicable EU Directives.
EU Declaration of Conformity
According to EC Directive – CE
- WE, producer: Shenzhen Tianyuan Huitong Technology Co., Ltd
- Address: 301, 13 Guishan Road, Caowei community, Hangcheng street, Bao'an District, Shenzhen
- Phone: 13714207997
- Email: 2268931200qq.com
This declaration of conformity is issued under the sole responsibility of the manufacturer.
- Product name: MINIPRINT (POCKET PRINTER)
- Model no.: C15
Has been designed and manufactured in accordance to the following technical regulation:
- RED directive 2014/53/EU
- ROHS directive 2015/863 and (EU) 2017/2102 amending Annex II to Directive 2011/65/EU
The object of the declaration is in conformity with relevant Union harmonization legislation.
| Standard | Report | Date |
|---|---|---|
| EN 62479:2010 | HUAX230717041KR | 19.07.2023 |
| EN IEC 62368-1:2020+A11:2020 | HUAX230717042KR | 19.07.2023 |
| ETSI EN 301 489-1 | HUAX230717043KR | 19.07.2023 |
| ETSI EN 301 489-17 | HUAX230717043KR | 19.07.2023 |
| ETSI EN 300 328 | HUAX230717044KR | 19.07.2023 |
| IEC 62321-1:2013 | XK2105013054R | 21.05.2021 |
| IEC 62321-3-1:2013 | XK2105013054R | 21.05.2021 |
| IEC 62321-4:2013+A1:2017 | XK2105013054R | 21.05.2021 |
| IEC 62321-5:2013 | XK2105013054R | 21.05.2021 |
| IEC 62321-6:2015 | XK2105013054R | 21.05.2021 |
| IEC 62321-7-1:2015 | XK2105013054R | 21.05.2021 |
| IEC 62321-7-2:2015 | XK2105013054R | 21.05.2021 |
| IEC 62321-8:2017 | XK2105013054R | 21.05.2021 |
The products were produced according to the European Union directive and standards.
- Producer: Shenzhen Tianyuan Huitong Technology Co., Ltd
- Stamp/signature: —
- Name/surname: —
- Title: manager
- Place and Date: SHENZHEN, 20.07.2023